
If you’ve been following my blog for a while, you might be surprised to learn that my gluten-free sourdough starter is now languishing in neglect at the back of my fridge since I discovered fermented buckwheat bread (poor thing!). Since making my first experimental loaf, I have baked only buckwheat bread, because not only is it delicious (even my kids switched over without complaint! that’s a good sign 😉), but I’m convinced that it is the most affordable, healthiest, and easiest-to-make bread option I’ve found till now.
Fermented buckwheat bread contains only three ingredients: buckwheat groats, salt, water. To those, you can choose to add what you like for flavour and texture. I always add soaked sunflower and pumpkin seeds to the loaf, and sprinkle sesame seeds on top. I once stirred raisins and walnuts through it, which the kids really liked. But the simple sunflower, pumpkin, and sesame seed loaf is my favourite, so I don’t really feel compelled to experiment much more with other ingredient combinations, to be honest! Although the bread is fermented, it doesn’t require any living starter, which means you don’t have to feed anything between bakes – a major plus for those of us who don’t have the inclination or are not very good at remembering to feed sourdough starters! It takes just a few minutes to prepare the ‘dough’ before baking, but it does require a lot of resting time (soaking, and then fermenting). I love that the bread contains no gums (eg. guar or xanthan), it requires only a few ingredients (= simple pantry), and it’s made from a whole seed and not a processed grain.
Yep, you read that right. Buckwheat is a seed, not a grain – although it is commonly referred to as a pseudo-grain. It is therefore gluten-free, has absolutely nothing to do with wheat (despite its name), and while it consists of mostly carbohydrates, it is high in protein and fibre, as well as a range of nutrients and anti-oxidants. I like the idea that the main source of grains in my diet is now a buckwheat-based bread because I am half-Japanese. Buckwheat has been part of the Japanese diet since prehistoric times – in Nihongo it is called “soba“. In Japan, they commonly use buckwheat to make soba noodles (and note that these days they usually mix in a bit of wheat to improve the texture). It makes sense to me to lean towards the kind of foods my grandparents ate, as I search for foods that will nourish and not irritate my digestive system.
Another great aspect of this bread is that you can make it with organic ingredients, and still achieve a gluten-free, gum-free, naturally-fermented bread for a really affordable price. For those of you who are on a tight budget, it might be helpful to know that each loaf requires 3½ cups of buckwheat groats, which equates to around 670g of groats. At $6/kg you would therefore need to spend around $4 on the buckwheat groats, plus the cost of 1 tsp salt, and any seeds/nuts you might want to add. My finished loaves weigh around 1400g.
I definitely prefer eating my buckwheat bread toasted, and I absolutely love it topped with extremely generous quantities of homemade pesto! 😋 But I have, on occasion, sneaked some nut-butter sandwiches into the kids’ kindy lunches and I was secretly surprised that they ate them with about as much enthusiasm as their usual GF banana pikelets, so the bread must be quite tasty to them without disguise.
I would like to say that I invented the whole concept of fermented buckwheat bread, but of course that isn’t true. This recipe is a derivation of the possible original one (there are lots out there) at: www.consciouscatering.ca. I hope you love it as much as I do – if you give it a go, please feel free to share your feedback via the comments at the bottom of this post!

Fermented buckwheat bread
Ingredients
- 3½ cups organic buckwheat groats
- 2 tsp salt
- 1 cup water
- ¼ cup sunflower seeds
- ¼ cup pumpkin seeds
- sesame seeds for sprinkling on top
Instructions
-
Scoop the 3½ cups of buckwheat groats into a large bowl or pot and cover with water by about 4 cms. Put a plate or lid on top and leave at room temperature overnight or at least 6 hours. Soak the sunflower and pumpkin seeds in a separate dish, adding half a teaspoon of salt and enough water to cover the seeds by a few centimetres.
-
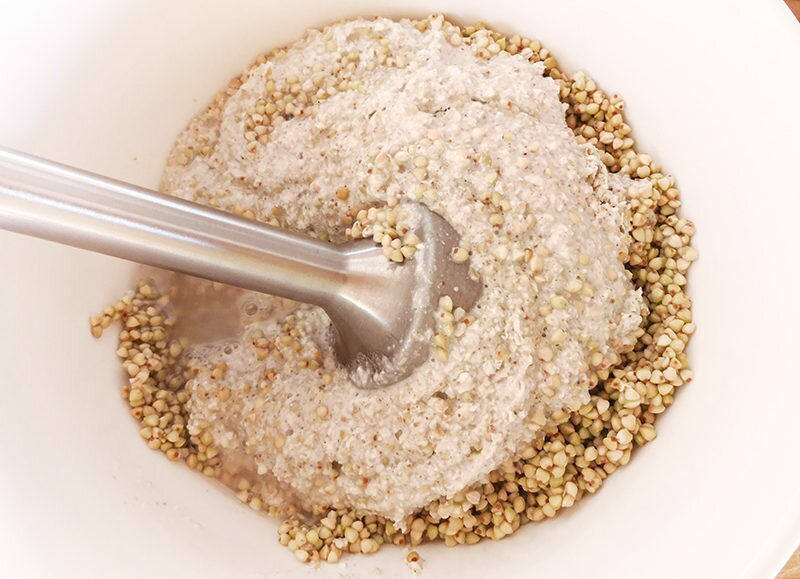
After soaking, strain the groats using a sieve or colander, and rinse lightly. Return the groats to the bowl and add the salt and 1 cup of water. Use a whizz stick to puree the groats so you get a smooth batter. Strain and rinse the seeds, and then stir them through the batter.
-
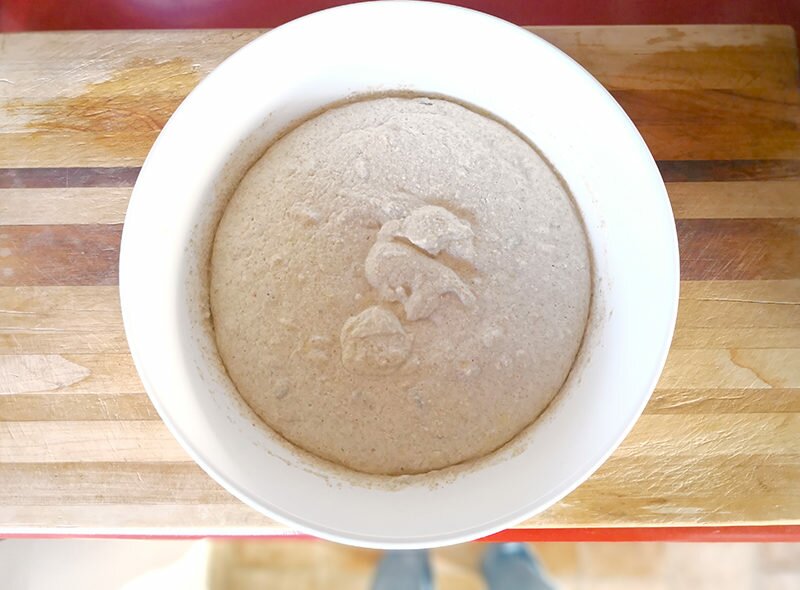
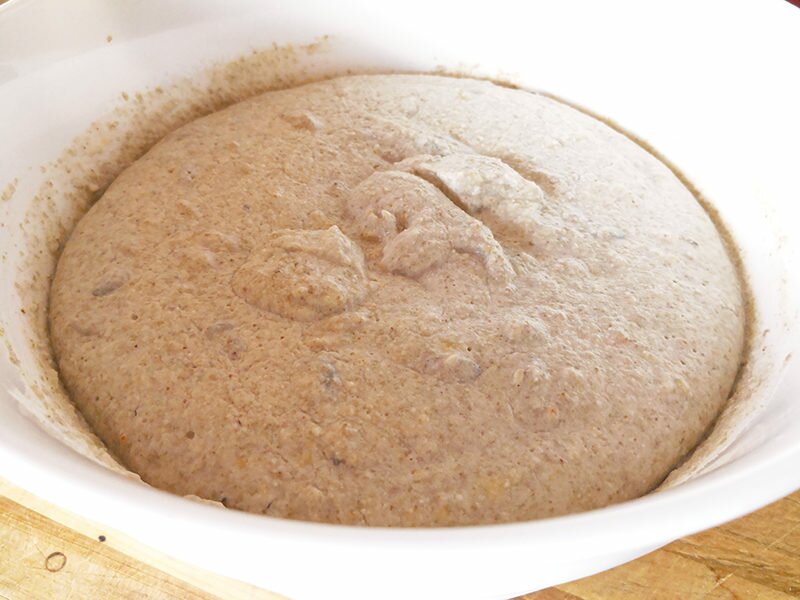
Cover the bowl with a plate and leave out at room temperature for 24 hours. If it's particularly cold you might need to leave it for a few hours' longer, but you will know that your bread batter is ready when it's formed a slight dome from rising. In hot weather it will ferment faster and you might find it's ready in half the time.
-
Preheat your oven to 200˚C. Pour the batter into a silicone loaf pan (I sit my silicone pan inside a glass one so that it keeps its shape when it is full). Sprinkle sesame seeds on top.
-
Turn the oven down to 180˚C. Cook the bread for 1 hour 15 minutes until it is golden brown and crusty. Gently tip the bread out of the loaf pan and leave on a rack to cool for at least 30 minutes before slicing and eating!
Recipe Notes
As with all fermenting, I recommend avoiding metal dishes or utensils. I personally use a large ceramic bowl and a wooden spoon. I bake the bread in a silicone loaf pan because the greased glass loaf pan experiment was an epic fail - the bread stuck to the sides in a major way! I had to chisel it out with a knife... You could also use baking paper to line your loaf pan of course.
And for those of you who need some images to inspire / guide you…
And so you can get an idea of the texture…!
Hi – I love the addition of the 2 seeds you add & I will try this with my next batch. I’ve been making a very similar buckwheat loaf for about 3 years and have found the best way to store it is pre-sliced in the fridge. No mold ever and I have kept it for a week this way since I started making it with no problems.
I use a food processor to mix mine but I agree with you that there is way too much clean up after. I recently upgraded my Kenwood mixer and now do a coarse grind of the groats and that seems to work for me. I loved it toasted best as many of your readers have mentioned. About 8 months ago I started making a buckwheat sourdough starter and adding that to the original mix – YUM YUM. I feed it for 2 days then place the starter in the fridge until the day before I want to use it, feed it once more then use it.
Hi, thanks so much for sharing your insights! I’ve started sprinkling sesame seeds through the batter too, and I really like that. I’ve never even considered using a sourdough starter with it – might give that a go this summer! Thanks again for sharing 🙂
Amazing! Thank you! How well does it freeze?
Personally I think it freezes very well. Thanks for the great feedback!
Hi there and thanks so much, a brilliant recipe. Just a query, I’d like to try pulsing the soaked groats in a processor next time. Is there a reason you don’t do this?
Hi, thanks for your feedback and I’m so pleased to hear you love the bread! I’m sure you could use a food processor – the only reason I use the whizz stick is because it’s less washing up! My food processor has lots of pieces that all need washing after I use it so I consider my whizz stick to be the lazy option haha.
Today was the 3rd time I made your buckwheat bread. I love it! I am trying to stay away from gluten and refined flour products. Mine has been rising a lot more than yours after 18 hours, even though my house is quite cool in the summer with the A/C on. I end up with 2 medium size loaf pans. I have been adding pumpkin seed and home made raisins from our grapes. I have 2 questions:
How do you make yours rise more in the center, do you let it rise a second time and make a slit on the top?
Is there a good way to store them to preserve their delicious moisture?
Hi there, I’m so pleased to hear you are enjoying the buckwheat bread! To answer your questions… 1. No I don’t let it rise a second time; I don’t do anything fancy. It just does what it does. I’m a very lazy baker! 2. Unfortunately it does dry out more quickly than store bought breads, and I’ve noticed it also goes mouldy faster too. I guess that’s the downside of preservative-free baking! I keep mine in a beeswax wrap and I usually leave it out in the pantry the first day but then move it to the fridge after that. It does freeze and thaw pretty well so that’s another option – to slice and freeze half the loaf. I usually eat it toasted with coconut oil and spreads so it doesn’t matter too much to me, but it’s best for sandwiches within a day of being baked I think.
Is it okay to use toasted buckwheat groats? Other attempts with other recipes have turned out fine with raw groats but I like a darker bread. Looking forward to making this one.
Hi there, I’m sorry I have no idea. I’ve only ever made my bread the way I’ve written in the recipe. Feel free to let me know how it goes if you try!
I’m a newborn gluten free baby, not by choice. I was scrolling pages and pages of gluten free bread recipes but really didn’t fancy a slice of tapioca for breakfast. Gave this a crack over the weekend using the sunflower and pumpkin seed combo mentioned and I almost cried at how good it was. Just ate a crust with butter and peanut butter and am now overcome with bliss. Bread is back on the menu!
I’m sooo happy I could help you with this recipe! 🙂
well thanks for replying 🙂
My daughter liked it toasted and asked me to make more.
After we finish our half 25kg buckwheat flour bag, we’ll buy groats and I’ll tell you the difference 😉
Hi, so glad I came across this recipe. I will be definitely giving this a go. I would like to ask before I make it about the oven temperatures, are they for a fan oven or conventional oven?
Angela
Hi Angela, yes it’s for a conventional oven.
Wow, awesome bread! Beautiful flavour, and so simple. Hopefully the recipe can be downsized as I found 3.5 cups of buckwheat makes a huge amount of mixture – way too much for my decent sized loaf tin. Next time I will try 2.5 cups of buckwheat and adjust other ingredients accordingly.
I have been baking with sourdough for years and we are not gluten-intolerant, but I was intrigued by this… It worked out wonderfully! I was amazed at how well it fermented in such a short time! Flavour-wise it is a little bland for my liking. Might try to experiment with spices such as fenugreek, fennel or cumin – and a tiny bit more salt. Do you think I could add some apple cider vinegar to give the bread a slight tanginess?
Yay, I’m so glad you like it! I’ve upped the salt to 2tsp myself recently; you could probably add even more? I’ve been meaning to get a bit more experimental too, with nuts and dates/raisins etc, but haven’t had the time yet… I can’t imagine adding apple cider vinegar would do anything but enhance the flavour – if you try it, do let us know how it goes! Thanks for sharing your feedback 🙂
Hi Ester, would you consider doing a video tutorial of this? I love your YouTube series. I’ve never baked bread before but I would love to attempt this recipe, looks so good and healthy.
Hi Claudia, yes i’ll definitely do a video tutorial if you think it will help! But it’ll be a few weeks away I expect… can you wait a bit longer?
Esther 🙂
Hi,
I made this bread many times but not once with the salt at the fermented step. I’ve always added the salt after the fermented proces was finished.
Thanks for sharing! 🙂
Hi again
I’m tasted right now my bread made with flour instead of groats, how does your bread taste like?
mine tastes good but the taste of the crust is quite strong and the smell too (I was just thinking where is the limit, when you can say if it’s fermented or rotten?! 😀 my husband was a bit skeptic.)
Before cooking, I left it ferment for more than 24h, there was a slight dome and it was fluffy inside, but the bubbles once cooked were not as big as yours. The cooked inside is a bit bouncy, not too moist not to dry, maybe more like pancakes, and the crust brown and crunchy. My amount of water was approximative as I was not sure about how to adapt with flour.
Hope it helps and let me know what you think 🙂
Hey, thanks for sharing your experiences! So I guess buckwheat flour can work after all? Yes, as for the smell, others have said they find it quite smelly and I guess it’s a personal preference thing. I don’t mind the smell, I think it smells good haha!
Hi
your bread looks amazing!!! very excited to try your recipe.
do you think buckwheat flour would work too?
Hi there, I very much doubt that buckwheat flour would work but having said that, I’ve never tried it! So if you decide to try it and it works, please let me know! 🙂 Esther
Hi! I’ve had my buckwheat batter (minus pumpkin seeds) for over 24 hours, but it hasn’t formed a dome at all. Any ideas??
thanks
Leave it for another 6-8 hours? Let me know how it looks then 😉
So happy to have come across this recipe, thankyou!
I was I just wondering if you could let me know how much your bread rises? I noticed mine didn’t seem to rise during the second ferment but I had it in a glass bowl and saw lots of teeny tiny bubbles at the bottom so placed it in the oven anyway. It rose a little but then the ‘bread’ seemed uncooked and the crust was rock hard. Can’t really figure out where I went wrong other than maybe not putting in enough salt as the second ferment was for 27hours.. Have you ever had this happen? And if so, did you ditch the bread or found another use for it? Thank you
I don’t bake my bread until the batter has formed a dome on top – the whole batter should be frothy when you scoop it out of the bowl and into the baking tin. Was yours like this?
Yum! Came out well, and easy as. Thank you! Now to try with the family
Great! Thanks for feeding back 🙂
Hi, I’m just wondering if anyone has had this happen? The first time I made this, I substituted 1 cup of buckwheat with quinoa and followed the instructions- the recipe turned out great! The second time, I used all buckwheat. After the fermented phase, I took the plate off and it was covered in red dots? They were only on the surface.
That’s so weird! I’ve never had that happen to me… I’ll do a little research and see if I can come up with any answers for you.
Hi, I just thought I’d let you know that this happened to me recently! I’ve been baking a couple of loaves of this bread each week for a few months now, and this is the first time I found pink/red dots on the surface of the batter. I left mine out a bit too long by accident, so I assume this is why it happened to me. It could be bad but I baked mine anyway and it came out looking like a normal loaf!
THIS BREAD!!!!! So good, can’t believe how well this turned out and how easy this was. I have been making other GF loaves for a long time (with a lot of ingredients), but this is by far our new family favourite. Thanks so much Esther for sharing this recipe!
I am so excited to try this, Es!!! Is the buckwheat flavour very strong? Thank you so much for sharing this xx
Hi Dana! Ooh I hope it works for you guys! It definitely has a buckwheat taste but I’m sure that fermenting it makes it MUCH more palatable. I don’t think my kids would eat it otherwise. They still flatly refuse buckwheat porridge (I tried again recently). The fermented buckwheat pancakes I made experimentally this morning were a big hit with them too (see my insta ). But then we haven’t eaten wheat bread in so long maybe our taste buds have evolved in a way that other people wouldn’t appreciate haha Let me know what you think – I’m keen for feedback! Xxx
Hey Esther. Does Bin Inn sell the groats? Keen to try
Hi there, I would expect Bin Inn to have buckwheat groats, but maybe not organic? I might ask the guys at Bin Inn Dinsdale if they can get it in for me…
SUPER excited to try this. Buckwheat soaking right away! Which size silicon loaf pan do you use? Thanks x
Hey! So I measured my silicone loaf pan and the inside measurements are: 24cm long x 10.5cm wide x 7.5cm high. It’s Tupperware brand. I hope you like the bread!