
The past couple of weeks have passed by in a total blur, as we have sold our house in Hamilton East, moved ourselves across town to my father-in-law’s house, and then discovered that we (and he) have FAR too much stuff that we really don’t need. When there’s not enough room, something’s got to go, and suddenly I’ve realised there’s so much stuff taking up space in my life that I NEVER use, let alone look at! (Of course, I realised this after we moved it all, haha). So I’ve spent the past week saying goodbye to 20-year-old report cards and merit certificates, some books and letters, random old nicknacks and kitchenware, and generally just minimising my spatial footprint at home. I also got into my father-in-law’s garden pretty quickly and dug up all his impatiens, begonias, and weeds, to replace them with some winter veggies for us to eat! We now have little seedlings of kale, broccoli, baby beetroot, spinach, celery, and silverbeet, as well as rosemary, thyme, and chives, growing outside the dining room window. As a result of all this busyness, my cooking has been pared right down to the quickest, most predictable meals, with much repetition (fortunately, no one gets sick of homemade chips and mayonnaise!) and takeaways…
It’s a good sign that my life is settling down to a more manageable pace when I start thinking about and preparing ferments again. Thankfully, we’ve still got lots of sauerkraut to eat our way through before I need to worry about us running out. I’m getting the hang of making water kefir now and Stella and I drink some ginger-infused kefir daily. Our kombucha is currently turning to vinegar while we wait for Daddy to install a whole house water filter, hopefully this weekend! I’m still making small amounts of milk kefir for the kids and I’ve switched to using goats’ milk because I like how it’s runnier and doesn’t separate like cows’ milk does. And the last of my regular ferments, pickled radishes, is back in business now too, with a fresh jarful on the dinner table since last night, yay!
Apart from sauerkraut and kimchi, I haven’t done many vegetable ferments but I read that radishes are some of the easiest veggies to successfully ferment. I also noticed that the fermentation time for radishes is only a week. Because they are available year-round in NZ and they grow so easily, I decided to give it a go. Turns out, fermented radishes take literally minutes to prepare, and the kids and I love them so much that we practically eat them like lollies 🙂 . I put them in Stella’s kindy lunchbox sometimes, and she always eats them. They are crunchy and salty-sour, bite-sized little morsels of probiotic goodness; I really can’t recommend them enough! If you’ve bought yourself a Mrs Goodness fermenting kit but it’s been sitting around uselessly till now, why not grab yourself a couple of bunches of spray-free radishes and have a go too? Just to prove how easy it is, I’m going to talk you through the recipe, step by step (or you can scroll down to the recipe card at the bottom of the post if you’re too impatient 😉 ).

First up, I usually start with 2 bunches of radishes. This fills up my 850mL fermenting jar nicely, leaving enough room for the weight, some brine to cover all the radishes, and a bit of extra space under the lid. I trim all the greenery off, chop off the roots, and then give them a quick rinse clean. After that I chop them into quarters.
To prepare a brine, I mix 1 Tbsp sea salt (or you could use Himalayan salt) to 2 cups of filtered water and then stir to dissolve the salt. I fill my clean jar with the chopped radishes, sometimes sprinkling them with mustard seeds. The glass weight rests on top and then I pour the brine in, making sure there’s enough brine to completely cover the radishes, plus a centimetre or two more. Then I clip the lid on, fill the airlock with filtered or cooled boiled water to the half-way mark, and insert the airlock into the gromit-lined hole in the lid. And that’s it!! Seriously!
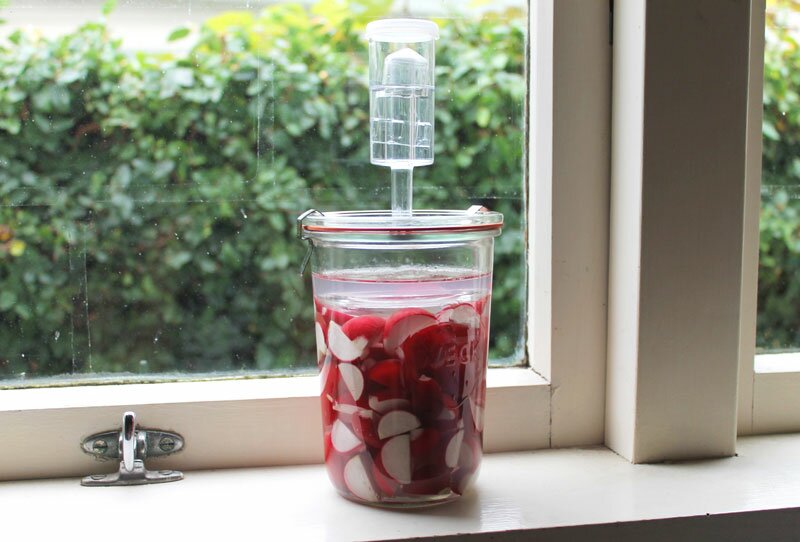
The fermenting radishes need to be kept out of the sunlight, and I leave mine at room temperature for a week. After a day or two, bubbles start to appear on the surface of the brine, which means that fermentation is taking place, yay! When they are ready I remove the airlock, clips, and lid, eat a radish or two …and then cover my jar with a glass or plastic lid and store it in the fridge. Be warned though, that fermenting radishes will boost your confidence in the process of fermentation and you will be tempted to try pickling all sorts of other veggies, like gherkins and beetroots! Beetroots are my latest – I currently have an experimental first jar of fermented beets in my cupboard right now. I’ll be sure to let you know how they turn out too 😉 . (UPDATE: They turned out yuk 😛 . The beetroots are officially still a work in progress!)
Easy Fermented Radishes
Ingredients
- 2 bunches fresh radishes (preferably home grown - if not, organic - if not, spray free!)
- 1 - 2 Tbsp sea salt or Himalayan salt
- ½ - 1 litre filtered water
- yellow mustard seeds (optional)
Instructions
-
Trim the greens and roots off the radishes, then rinse them clean. Chop radishes into quarters.
-
Prepare a brine by mixing 1 Tbsp sea salt or Himalayan salt into 2 cups (½ litre) filtered water. Stir to dissolve the salt.
-
Fill your clean fermenting vessel with the radishes, sprinkling mustard seeds over if you like. Rest your glass weight on top of the radishes and then pour the brine over so it covers the radishes and weight by 1-2cms, leaving a couple of cms of airspace between the brine and the lid. If you don't have enough brine, you can make some more using the above ratio of salt to water.
-
Clamp the lid on, fill the airlock to the fill line (around half-way) with filtered or cooled boiled water, and insert the airlock into the gromit-lined hole in the lid so it pokes out a bit underneath the lid. Leave your radishes to ferment at room temperature, out of sunlight, for around 7 days.
-
When they are ready, open the lid, eat a couple of radishes, cover the jar, and then store it in the fridge. It will keep for much longer than you need it to - ours never last longer than two weeks!
Recipe Notes
These instructions have been written for the 850mL fermenting kit I sell in the Mrs Goodness shop. The airlock means that fermentation gasses can escape the jar without you having to release or remove the lid. This just reduces the likelihood of contamination, but it is not an essential as long as your utensils and workspace are clean and your veggies are completely submerged under the brine.
2018-02-28: I recently made a little instructable on how to make fermented daikon pickles (daikon is a kind of radish) for my Instagram followers. Have a look if you’re the kind of person who needs to watch someone else do it first! 😉