Late last year I decided to switch to a gluten-free lifestyle to see if I could improve my health through my diet. Well actually, it was more about eschewing wheat in particular, rather than about me believing I’m an undiagnosed coeliac or thinking that I have a gluten intolerance. It seems to me that wheat is starting to stand out as a real irritant for lots of people – and interestingly, even vets recognise it as one of the two most common dog irritants (along with beef). I’m not going to pretend that I know why, because I’m no scientist, farmer, or health expert; but as soon as you start to read around on ‘gut health’ or any ‘gut disorders’, wheat and dairy come up almost every time as being the number 1 and 2 foods to eliminate if you want to give your guts a break and a chance to heal. I wrote my last blog post about how I wanted to balance my hormones through dietary improvements, but wheat was already in my firing line for being high in fructans (a vegetable form of fructose) and a possible cause for excessive gas and digestive discomfort.
Before going down this gluten-free path, I was already mad about sourdough bread and we were all eating my homemade traditional sourdough bread daily (and loving it). Even though it’s made with wheat flour, sourdough bread can be tolerated by some gluten-intolerant people because the slow fermentation process degrades the gluten, and although they are cooked to death, the beneficial bacteria seem to still have an anti-inflammatory effect on your digestive system. It seemed silly to me to switch from such a nutritious, healthy form of bread, albeit wheat based, to a highly refined, instant-food kind of gluten-free bread. (Read the linked articles at the bottom of this post to find out why I’m not a fan of ordinary gluten-free bread.) So naturally, I began exploring the possibility of a gluten-free sourdough bread. (I checked on google, and yes it was possible! 😀 )
My first attempt at baking a gluten-free sourdough was yuck – I think there’s no need to expand on that descriptor, suffice to say that I baked quite a few bricks to begin with 😛 . My early attempts turned into a crumbly mess that piled up in the bottom of our toaster. So I decided to pay the experts and I bought a loaf of Flaveur‘s gluten-free seeded sourdough bread. To date, this is my favourite gluten-free bread I’ve bought, hands down. I would love it even if I didn’t care about gluten. It’s moist, tasty, edible without toasting – and it didn’t crumble apart in my toaster either! I was now resolved more than ever to bake my own loaf that tasted this good. You might wonder why, when I could just buy it ready-made? Because gluten-free sourdough bread like this is REALLY expensive ($7+ per loaf). This is fine for the odd loaf, when you’re eating just one a week or so. But I’m raising two giants (one of them a male giant) alongside a giant husband, all of whom have giant-sized appetites for bread. And I’m not into the idea of having one kind of bread for mummy and one kind of bread for everyone else – as far as I’m concerned, what’s good for the goose is good for everyone else, and we should all be eating the same foods, together.
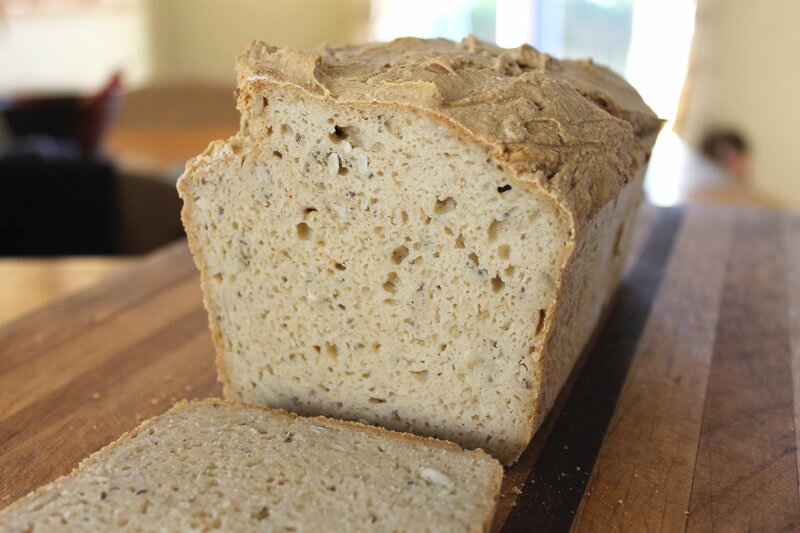
My experimentation in search of the ultimately edible sandwich-friendly, kid-friendly, husband-friendly gluten-free sourdough has resulted in a lot of bird food and compost over the past few months. I tried to keep the list of ingredients as short as possible and as simple as possible, and I wanted to avoid all gums (these are usually added to gluten-free baking to prevent everything from crumbling like mine did). In the end, I caved and tried a loaf with xanthan gum (organic, GMO-free, etc etc) and it was like magic. The resulting loaf (and the recipe I’m about to share with you) was spongy, light, and didn’t disintegrate in my toaster! It freezes well, toasts well, slices well. It can be eaten fresh as sandwich bread, and it’s even better when toasted (FYI, it takes a little longer to toast than wheat bread). Most importantly, it’s yummy and everyone who’s tried it has liked it and found it eminently edible. It’s a low-effort recipe, requiring no special gadgets or elbow grease, but it does take time (waiting time) so you can’t just look in your bread bin, realise it’s empty, and whip up another loaf ready to eat an hour later.
I did a quick cost calculation of ingredients and found it came to $3.64 per loaf, including a number of organic ingredients, BUT I’m a bit disappointed to update that figure now with a revised $5.52 per loaf plus the cost of the xanthan gum (it’s expensive to buy but you don’t use much) since I added free-range eggs and NZ olive oil to the recipe. I guess it’s not going to save tonnes of money after all – unless you have your own chickens – but I will continue to bake this bread for us because: 1. I know what’s in it and the ingredients are of the highest quality, 2. It’s zero waste and plastic bag free, 3. It tastes better than any GF bread I’ve bought, 4. It’s still cheaper than the store-bought GF sourdough breads (and it’s a bigger loaf too), and 5. I enjoy making our food.
Ok, so now I’ve convinced you of its awesomeness, let’s get on to the recipe. Skip right down to the bottom of this post if you just want to read the recipe card!
Firstly, you will need a cup of active gluten-free sourdough starter at the ready. I use a 100% brown rice flour starter that I brought to life from rice flour and water using the instructions of “Whole New Mum“. I’m impatient so I decided to kick-start it into action by adding 1tsp whey from our milk kefir. Because I did this in summer, my sourdough starter was alive and ready for action within 2-3 days. I’ve noticed the gluten-free starter is much hungrier than my old wheat flour starter, so I need to feed this one about 4 hours before I want to use it. (I also keep my GF starter in the fridge in-between bakes to slow it down and keep it really low-maintenance.) I’m also a seed-soaker so I make sure I have some sunflower seeds soaking in advance too (Update: I now add ¼C pumpkin seeds in with the sunflower seeds).
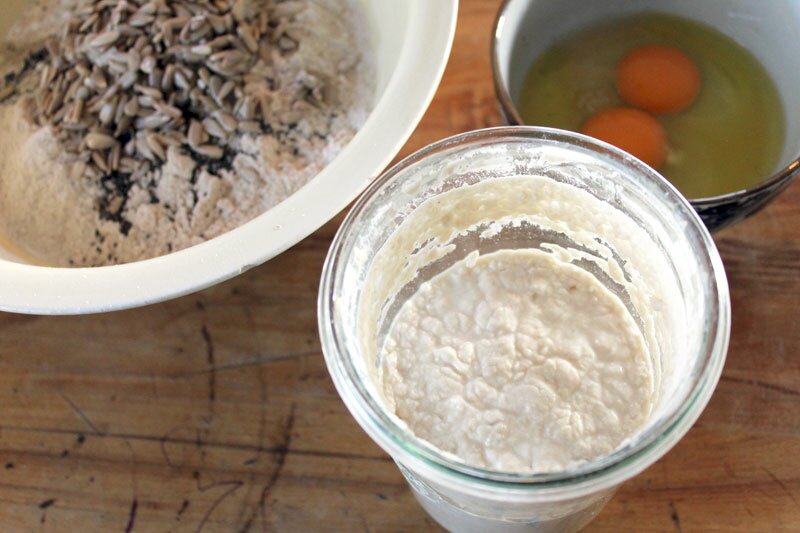
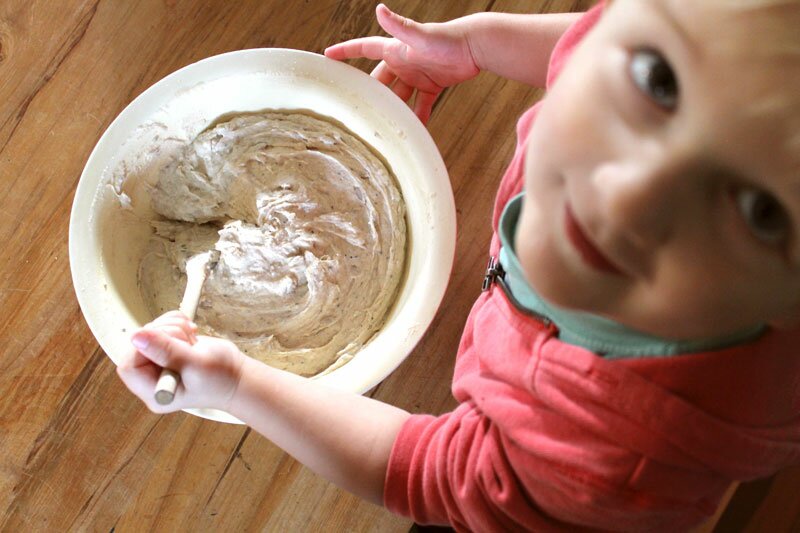
To begin, I start with a large mixing bowl and I add all the dry ingredients: the flours, salt, chia seeds, guar gum, and strained sunflower (and pumpkin) seeds. I stir them together with a wooden spoon, then make a well in the middle. In another smaller bowl, I add the eggs, olive oil, and apple cider vinegar. I whisk these together with a fork (no fancy equipment needed here!) and pour it all into the large mixing bowl. Next, I add 1 cup of the sourdough starter and 1 cup of filtered water and mix everything together with the wooden spoon. As the water is quickly absorbed by the flour, I add the remaining water and stir it all together, scraping the bottom regularly to make sure I haven’t missed any pockets of flour.
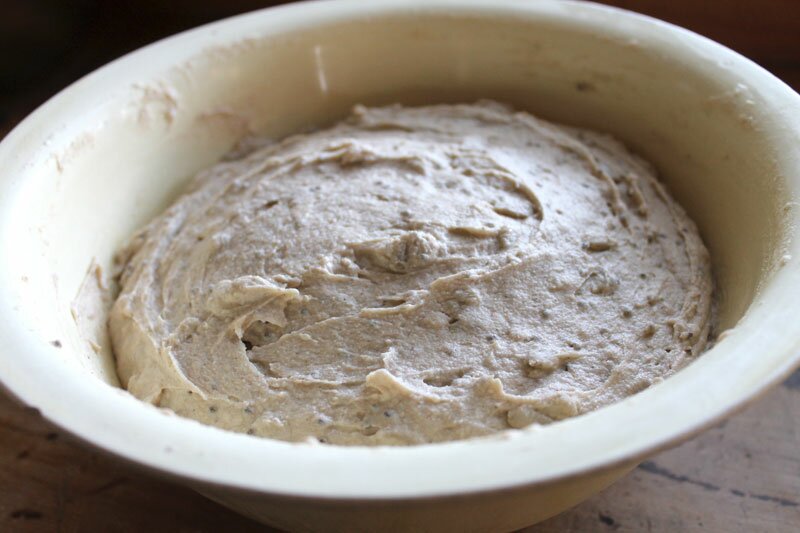
When it’s all mixed together well and it’s a sort of gluggy thick consistency, I flatten it out with the spoon, cover the bowl and place it in the fridge until its risen and formed a bit of a dome. This takes up to 24 hours lately, but I guess if you wanted to bake it sooner you could leave it out at room temperature and it should rise much faster. (Update: it’s winter now, so I’ve been leaving my dough out on the kitchen bench overnight, covered with a plate. In the morning it’s ready to bake and I think the finished loaf has less cracking on top for having risen more fully before baking.)
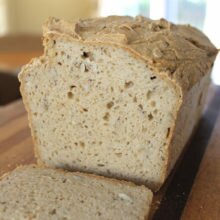
When it looks like this I take it out and transfer the dough into a greased loaf pan (I use a glass one and the bread never sticks to the pan so long as I grease it with butter). I bake this bread at 180°C from a cold oven for 1 hour 15 minutes, and I like to put a dish with a bit of boiled water into the oven as well – I’m no baker but I understand that the steam from the hot water helps to make a crispy crust. I haven’t taken the time to investigate this idea further so it may be a silly habit I do in vain, but every time I pull my cooked bread loaf out of the oven, it looks just like this:

= PERFECT!!!
I do wait for it to cool before slicing it. It keeps very well for a couple of days wrapped in a tea towel in our bread bin, but longer than three days or so and it did start to get fuzzy mould in summer. I now keep half in the fridge and half in the bread bin just in case. It freezes well too 🙂 .
I’ve very consciously decided not to keep this recipe a secret because I believe that healthy, delicious food should be available to EVERYONE. You are most welcome to bake this bread, share it with others, and share the recipe with your friends and family. If you love it as much as we do, and you think it’s worthy, I hope you will consider buying the recipe as a gesture of thanks, simply for the cost and effort I put into developing it. However, if you can’t or don’t want to, that’s fine also – I will never think the worse of any of my readers! Thank you, Esther x

(Please note the currency is in New Zealand dollars!)
Mrs Goodness' Gluten-free Sourdough Bread Recipe
Ingredients
- 150 g brown rice flour
- 165 g sorghum flour
- 55 g buckwheat flour
- 90 g tapioca flour
- 1½ tsp salt
- 2 tsp guar gum
- 2 tsp chia seeds
- ¼ C presoaked sunflower seeds (drained)
- ¼ C presoaked pumpkin seeds (drained)
- 2 eggs
- 1 Tbsp olive oil
- 1 tsp apple cider vinegar
- 1 C active gluten-free sourdough starter
- 1¾ C filtered water + add a bit more as needed to achieve the right consistency
Instructions
-
In advance of preparing the bread mix, I soak ¼ cup sunflower seeds and ¼ cup pumpkin seeds in filtered water with 1tsp sea salt for a few hours or overnight, then I strain them. I also feed the sourdough starter a few hours earlier (or the night before if I'm doing it in the morning) so that it's active and full of bubbles.
-
To prepare the dough, put a large mixing bowl on your kitchen scales and hit tare. Add all the gluten free flours (you can hit tare each time so you know how much of each to add), salt, guar gum, chia seeds, sunflower and pumpkin seeds. Mix together with a wooden spoon.
-
In a small bowl, add two eggs, olive oil, and apple cider vinegar. Whisk together with a fork.
-
Make a well in the flour mix, then pour the egg mix in. Add the sourdough starter, then add 1 cup of water and carefully mix everything together with a wooden spoon. Add the rest of the water gradually, making sure you scrape the bottom of the bowl with your spoon to ensure all the flour is mixed in. You want it to end up like a really thick batter, so add a wee bit more water if you need.
-
Cover the bowl and leave in the fridge for 12-24 hours so that it's risen a bit. In the winter when it's cooler, you can leave your covered dough out at room temperature overnight (approx. 8 hours). Transfer to your greased loaf dish and let it sit out for an hour or so before putting it into a cold oven. (I also put a dish with about a cup of boiling water in the oven because I think the steam improves the crust?!) Turn the oven on to 180°C and bake for 1 hour 15 mins.
-
When the bread is cooked, transfer it onto a wire rack and leave it to cool completely before slicing.
* You can substitute the rice flour with oat flour, as I’ve been doing for a few months after reading about concerns regarding arsenic in rice flour (brown rice contains higher levels of it than white rice, apparently). I’ve recently switched back to rice flour though, as the oat flour version is a wee bit drier than the rice flour bread. Because we don’t really eat processed food I’m ok with using brown rice flour for our bread as we don’t really eat much rice anymore anyway. If you’re interested, Dr. Axe has written an article about the awesomeness of oat flour: https://draxe.com/oat-flour/.
FYI, here are some interesting articles I read about gluten-free diets and the benefits of fermenting:
1. “Gluten-free sourdough may reduce inflammation for celiac sufferers”
2. “Looking Beyond Gluten-free: Choose a gut-supportive diet for long-term health with celiac disease”
3. “The only bread you should eat”
Ah… Yes, I´ve heard that some are sensitive to psyllium although it´s natural and chia seed meal should work as well, as you say. Haven´t tried that yet, as I´m very happy about psyllium, but I believe I will in the future! I also made a yeast bread with eggs, based on mostly almond meal to make it low-carb/high-protein. But now I´m very into sourdough as it so healthy and solves the ‘fytic-acid-problem’! And I love watching the sourdough grow… Happiness in a jar 😉 Don´t know about where you live, but here (in Sweden), not even the bakery make proper gluten free bread! I asked… It´s not sourdough and they use flour mixes with e-numbers and wheat starch…
This looks really yummy. I started to bake gluten free sourdough bread myself some time ago… Interesting with egg in the recipe! Just wanted to say that you can use a totally natural product called ‘psyllium seed husk’ or psylllium husk. It´s simply a powder made of milled psyllium seeds. Super healthy and filled with fibers! It helps gluten free bread as well as cakes to stay moist and not fall apart. With the right amount bread can stay moist for 4 dags without problem. 🙂 But I don´t know if you have this product where you live… I live in Sweden.
Hi, thanks for sharing your tip! Yes I used to use psyllium husk, but my little boy’s tummy was quite sensitive to it so I cut it out for a while. Chia seed meal is also a good egg substitute I believe, although I haven’t tried it myself.
Loving this bread recipe and it is producing a great big loaf each time. Thanks so much for the recipe! Our family favourite and every morning we have it toasted as the base for our scrambled eggs, fermented veges, steamed/buttered greens. YUM!!!
I have tweaked the recipe a little as follows (rounded up the measurements and converted to cups and increased the amount of seeds used).
1 1/2 cups brown rice flour
1 2/3 cups sorghum flour
1/2 cup buckwheat flour
3/4 cup tapioca flour
1 tablespoon chia seeds
1/2 cup presoaked sunflower seeds
1/2 cup pre soaked pumpkin seeds
2 1/4 (+ more if needed) filtered water
I take out the starter from the fridge the night before and feed it 2 big spoonfuls of brown rice flour and 1/4 cup (ish!) of water and leave out on the kitchen bench. In the morning I prepare the dough as per recipe (re-feed the starter and pop back into fridge till next time), and put dough into a buttered bread pan/tin. Cover with gladwrap (which I re-use) and put somewhere room temperature. It stays there most of the day (last 1-2 hours I may pop in hot water cupboard or by a warm window) and keep eye on it so it doesn’t rise too high (can cause big internal bubbles which result in a hard to cut bread as it falls apart!).
At night I place it in pre-heated oven with the cup of boiling water and cook for 85-90min.
I leave the cooked bread (out of the tin/pan!) wrapped in a tea towel overnight to cool and pop it into a bag in the fridge for storage.
Tips:
-If you think the bread dough has risen too much, you can lightly tap once the tin to release some of the bigger internal bubbles.
– The loaf is best toasted (try the oven grill as a toaster tends to burn the edges faster) and is way tastier than anything in the supermarket! Try slicing from the bottom to the top (turn the loaf upside down onto a cutting board and push down firmly) to avoid the top crust falling off when slicing through that first (it can be a bit crumbly!)
-This loaf seems to get better by day 4-5 if it lasts that long!
Thank you for sharing all your tips! It’s so awesome to hear that others are enjoying this bread too
No worries!
Hi there,
In the instructions you use eggs but they are not included in the ingredient list. I was interested in the recipe thinking it was vegan. Just a heads up so you can correct the overlook.
Thanks so much for letting me know! I would never have noticed otherwise. I’ve corrected it, thank you 🙂
Wow that’s excellent, thank you so much. It is starting to smell nice and bit yeasty so I think it’s working
Hi there, do you have a gluten free sour dough starter recipe? Your recipe looks great but the link to the starter seemed abit strange. I’m trying to make a starter with brown rice flour and water, I’m not sure if it will work or what it’s suppose to look to like or how to tell when you need to pour off some of it.
Hi, thanks for getting in touch! I haven’t written instructions for growing your own sourdough starter, because to tell the truth, I’ve only done it myself twice – once with wheat flour, and then once with brown rice flour when I switched to gluten-free life. Both worked the first time and I’ve had my GF starter for about a year and it’s still going strong! Your could try looking at the pictures and instructions at: http://dontwastethecrumbs.com/2013/07/how-to-make-a-gluten-free-sourdough-starter/ Maybe that’s more helpful? Don’t worry so much about whether it will work or not; I’m sure it will! It’s pretty hard to stuff up, but even if you do you’ve only lost a little bit of flour and water and time! And you’ll have a better understanding of what works/doesn’t work for your next attempt 😉 Give your starter at least a week before you give up on it and start afresh – the first time I grew mine with wheat flour I had to wait 2 weeks for it to really come to life fully. When you’ve got your starter alive and going strong, you’ll figure out the best flour/water ratio just by feel (I don’t measure either out anymore) and how often to feed it. After you’ve fed it the starter will rise as it fills up with bubbles. When it’s eaten all the food, it will start to sink again. When it’s flat, it needs more food. When it starts to get a liquid on top, it’s REALLY hungry. It will give you plenty of warning signs before it starves to death, haha! Good luck and feel free to ask more questions… I hope this helped!